Home> Technical Articles> Installation of four-row tapered roller bearings
- Address1589 Tampines Industrial Distributor Avenue 5 Singapore 528759
- Factory Address1589 Tampines Industrial Distributor Avenue 5 Singapore 528759
- Worktime9.00--18.00
- Phone(Working Time)0065-31591338
- Phone(Nonworking Time)0065-31591338
- Fax0065-31591338
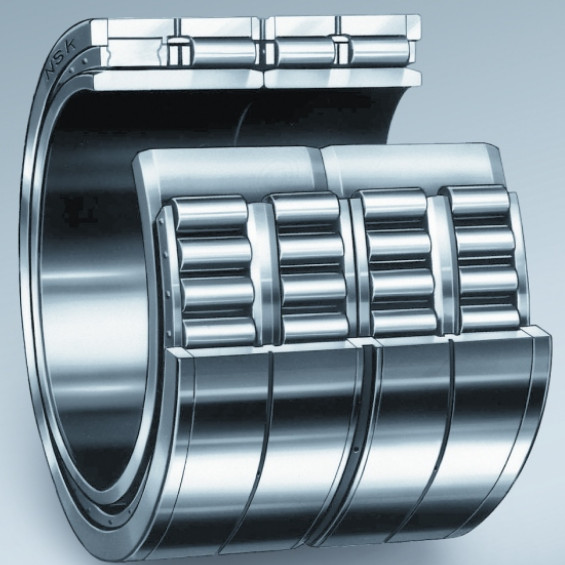
The basic requirements for four-row tapered roller bearings installation are: specially trained installers, check the shape tolerance of the bearing mating surface, keep the installation site clean, open the bearing package after the installation is ready, do not wash off the bearing anti-rust oil.
(1) Configuration of the bearing assembly. Open the bearing package, do not wash off the anti-rust oil, check the bearing assembly, ensure the bearing assembly is complete, the production year is consistent, the production serial number, installation sequence is represented by letters.
(2) The mating surface of the bearing. In order to prevent the friction between the roll neck and the bearing seat
The etch must be coated with a thin mounting paste (such as FAG), bolted to the end of the roller end to the bearing housing, and the bearing housing opening up on the flat support.
(3) Open bearings. First, the E end is facing down, lift the outer ring D-E and the outer spacer D, place it in the bearing housing, and then lift the parts in the given order and place them in the bearing housing. Be careful to align the load-bearing area. The rear-mounted parts must be in full contact with the front part and must not be tilted or skewed.
(4) Installation of open bearings with stamped cages. For bearings with stamped cages, place the inner ring E-Ce flat on the support (with the E end facing down), then place the components one by one in the correct order and use the lifting device to fit the complete bearing assembly into the housing to ensure load Zone I is properly aligned. Pin-type cage bearing, insert inner ring E-Ce (E end down), inner spacer C (positioning rib downward), double row outer ring BD and outer spacer B into the bearing housing For cage bearings, insert the inner ring A-Ca and the single row outer ring AB into the housing to ensure proper alignment of the load zone I. The pin cage bearing can be mounted using a lifting device like a stamped cage bearing.
(5) Installation of sealed bearings. Install a sealed tapered roller bearing with a special lifting device. The bearing assembly is completely assembled on the lifting device in the given order. Install the seal ring E first, and manually lubricate the roller and cage combination when installing grease lubricated bearings. Make sure that the load zone I is properly aligned and fit the assembled complete bearing into the housing.
(6) Rotating bearing. Use a 4 bolt to align the second end cap gently in the circumferential position (do not lock the bolt) on the bearing housing, rotate the bearing housing to the horizontal position, and fix the clamp to the end surface of the inner ring with a tie rod. It should be lighter and the clamp can only touch the end face of the inner ring. For sealed bearings, the lifting device is also used as a fixture. Gradually tighten the tie rods and end cap bolts and slowly and evenly rotate the inner ring until the inner ring fits completely into the inner spacer C without gaps. The gap S between the end cap and the bearing housing is measured using a feeler gauge to determine the seal thickness B. Rigid seal B = S - (0.05 ~ 0.1) mm; elastic seal B = 1.2 Smm.
(7) Install the seal. Loosen the end cap bolt and remove the end cap, insert the seal of the required thickness into the end cap, and apply grease to the inner ring hole to complete the installation.
(8) Heat the labyrinth seal ring in the oil bath and push the labyrinth seal ring together with the O-ring onto the roll neck. During the cooling process of the labyrinth seal ring, it must be pressed tightly on the roll end face. .
(9) Push the assembled bearing seat onto the roll neck, check the validity of the bearing seat seal and the bearing temperature regularly. After the bearing works for 1000~1200h, change the bearing area of the bearing. Record all maintenance and inspection work of the bearing on the rolling bearing test card. Change the bearing area of the bearing, disassemble the bearing in the reverse order of installation, carefully clean the bearing parts, then immediately apply oil, visually check the raceway and roller for damage, check the axial clearance, seal the bearing with new grease, follow the installation instructions Install the bearing and go to the next load zone. When changing the load zone for the first time, rotate the outer ring 180° to the load; the second rotate 90° to the load zone IV; the third rotate 180°. For sealed tapered roller bearings, after the bearings have been operated for 300h, 600h and 900h respectively, follow the steps below to check them separately: remove the bearing housing and remove the end caps to check the grease and grease status in the bearing and labyrinth seals. If the grease is discolored or contaminated, fill the bearing and labyrinth seal with new grease. Carefully inspect the bearing seal and replace the seal even if it is slightly damaged. All maintenance and inspection work on the bearing is recorded on the rolling bearing test card.
Bearing Distributors Inc changing the load zone for the first time, rotate the outer ring 180° to the load; the second rotate 90° to the load zone; the third rotate 180°. For sealed tapered roller bearings, after the bearings have been operated for 300h, 600h and 900h respectively, follow the steps below to check them separately: remove the bearing housing and remove the end caps to check the grease and grease status in the bearing and labyrinth seals. If the grease is discolored or contaminated, fill the bearing and labyrinth seal with new grease. Carefully inspect the bearing seal and replace the seal even if it is slightly damaged. All maintenance and inspection work on the bearing is recorded on the rolling bearing test card.


 Best-selling Rexroth Vane Pumps
 Best-selling Eaton-Vickers Piston Pumps
 Best-selling Eaton-Vickers Vane Pumps
 Best-selling Eaton-Vickers Aluminum Gear Pumps
 Best- selling Parker’s GEAR PUMPS